Before you start, let me say that reloading Fuji QuickSnap cameras is
not a trivial exercise. It's not impossible, either, but if you don't like
diddling with little bits of plastic, or are afraid of destroying a few
cameras or wasting a few rolls of film while you learn, then I don't recommend
reloading.
On the other hand, if the above sounds like fun to you, reloading QuickSnaps
can be a rewarding experience. The most important benefit to reloading
them is that you won't have to worry about finding cameras which fit into
your Aquashot if Fuji & Kodak change their designs again. Another benefit
is that you'll be able to take U/W photos cheaper than before. You can
also use whatever film you like in your cameras, including slide film.
Finally, someone recently pointed out to me that taking 4 or 5 disposable
cameras and 20 rolls of film on a dive trip is much easier than taking
20 disposable cameras!
I highly recommend reading each section in its entirety before proceeding
on that section. The sections are more or less self-contained, but you
should have a clear image in you mind of what it is you need to do for
each section before you do it.
One last comment, which I will repeat elsewhere in these instructions:
the flash unit can have dangerously high voltages present even if you
have removed the battery from the camera and let it sit for a day. I recently
discharged the main capacitor on a QuickSnap (immediately after firing
the flash, or so I thought) by bridging the leads with a small screwdriver.
The spots on the screwdriver which are now
should be evidence enough that the charge on that capacitor could do some
serious damage to a person.
Beware the flash circuitry, and especially the large capacitor
(the small cylinder on the top of the camera near the flash)! Avoid touching
any part of the circuit board!
Sorry about the blinking, folks, but I really want to make sure
you are aware of the hazards associated with the flash circuitry.
Table of Contents
Prerequisites: Required tools and materials
Here are the things you'll need to complete this project:
- Several small flat-blade screwdrivers. Jeweler's screwdrivers might
work, but they are probably too small. I used two screwdrivers from a set
I have; one had a blade about 1/16" (1.5 mm) wide, and the other had
a blade about 1/8" (3 mm) wide.
- A sharp, sturdy knife. The small blade of my Swiss Army knife worked
for me.
- A sheet of 1/16" (1.5 mm) dark plastic. You only need a piece
about 1" x 2" (2.5 cm x 5 cm)
- A bottle of "styrene weld glue" or a tube of plastic model
glue
- A roll of black tape, preferably 2" (5 cm) black "duct"
tape
- A ruler (preferred) or a straight edge.
- A completely dark room or a photographic changing bag
- A roll of 24-exposure film (must be at least ISO 400 speed)
- Another roll of 24-exposure film for practice runs (get the cheapest
you can buy)
- One AA battery to replace the battery which powers the flash
Step One: Getting used film out of your QuickSnap
The first thing you have to do before you can reload your QuickSnap
is to remove the camera from its paper carton, and then remove the film
from the camera.
Removing the paper carton can be done by tearing the paper, but I don't
recommend this. The carton adds an appreciable thickness to the camera,
which is important for proper fit in the Aquashot. Hence, you don't want
to destroy the carton. You can open the carton by sliding a knife blade
between the back panel of the carton and the bottom panel of the carton;
if you look at the seam between the back and the bottom, you'll see where
to insert your knife. What you need to do is to separate the two
panels, not cut through one or both of them. You'll also need to repeat
this process on the seams between the side panels and the back panel.
Once the back panel has been freed, you can easily lift the camera out
of the carton. Position the camera so you are looking at the back of the
camera, as if you were going to take a picture with it. On the right hand
side of the camera is the advance wheel. Rotate the camera so you're looking
at the bottom, and you'll see the battery which powers the flash unit.
Remove this battery by prying it loose, either with a small screwdriver
or with your fingers.
Here's a drawing of the front view of a camera, with labels which indicate
the important features.
Under the advance wheel (inside the camera, of course), is where the
film cannister is located. To get the cannister out of the camera, you
have to open the film cannister door. It's "locked" shut by two
latches on the front of the camera (indicated by the blue guides in the
drawing).
Start by rotating the camera so you're looking at the front but the
camera is upside-down. You should now see a lightning bolt pointing "up."
To either side of the lightning bolt are two little plastic tabs. These
tabs are the latches which keep the camera's film door closed. Using two
small screwdrivers (or your fingernails), gently pry the latches towards
you, away from the back of the camera. Then reach between the latches and
lift the door open. Alternatively, you might find it easier to lift the
door from the side, positioning your finger where the battery used to be.
Once the door is open, hold the camera right-side-up again, and the
film cannister should drop out of the camera. If it doesn't, make sure
that the film is wound all the way into the cannister, and try sliding
it from the compartment again.
At this point, you can take the film to your favorite photo shop for
processing.
Step Two: Removing the front of the camera
Removing the front of the camera is required in order to remove the
advance wheel, which we'll cover later.
Both film doors must be open, including the one under the film cannister
as well as the little door under the film take-up area, on the bottom of
the camera on the side where the flash is located. To open this door, insert
a small screwdriver into the recess on the bottom of the camera (near the
lightning bolt on the door, towards the front of the camera), and push
towards the front of the camera while lifting upwards. The door should
open easily.
On the side of the camera closest to the flash bulb, there is a little
restraining tab which holds the front of the camera to the back. Push this
in with a screwdriver. If you're gentle, you can avoid breaking this tab.
However, if the tab breaks, it's no big deal; the camera will still work
properly. Alternatively, I have recently found that if you squeeze the
side of the camera just behind the latch (towards the back of the camera),
you can slip the front piece off the latch without damaging it.
There are two other restraining tabs on the top of the camera, one near
the advance wheel and one near the flash (at the back of the camera). These
must be pushed in with a screwdriver in order to release the camera front.
After these tabs have been pressed in, start pulling the front of the camera
away from the back. There are some small restraining tabs on the front
of the camera, near the lens which may need to be released. Most of the
time, I find that a steady pull while "jiggling" the front piece
will cause the front to come off. If you don't feel comfortable with how
hard you have to pull, look around and make sure that all of the restraining
tabs have been released, and then keep trying. Beware that the tabs can
re-attach themselves pretty easily if you stop pulling, so keep up the
pull! Also, inserting a screwdriver into any open gaps you see while you
release other restraints can help.
Here's another picture of the camera, from three different sides, indicating
the positions of the 5 latches which must be released before the front
piece will come loose. The latches are circled in red. Sorry about the
colors, folks...This picture looks much better in the drawing program (Macromedia
FreeHand), but for some reason gets screwed up when I paste it into Photoshop.
Somehow the 5 different shades of grey I used get mapped into weird colors
like green. If you know why this happens or how to make the colors come
out properly, please tell me!
Beware: when you pull the front piece loose from the rest of the
camera, there are two small pieces which will fall out. One is a copper
lever arm about 3/4 " (2 cm) long. This arm is what bridges two contacts
which charge the flash capacitor when you hold down the "activate
flash" button. The other loose piece which will fall out is the main
camera lens. You do not want to lose either piece, so hold the camera
close to your work table when you open it!
Better still, place the camera on its back when you remove the front
piece. That way you'll get to see where the lens and the flash activator
arm are positioned and how the flash activator arm is oriented. This will
be important later.
Another warning: once you have removed the front of the camera, the
flash circuitry will be exposed. Be careful around this circuit board!
Touching the wires which come out of the little cylinder at the top of
the camera could result in a nasty shock, a deep burn, or it might even
be Even the surface of the circuit board can be dangerous!
Step Three: Removing the back of the camera
Removing the back of the camera is much more difficult than removing
the front, as the Fuji cameras are glued together in several places. Structurally
speaking, there is no need to glue these cameras; Fuji most likely did
this solely to frustrate attempts at reloading their cameras.
I have noticed recently that some of the QuickSnaps I tried reloading
are glued in only one spot, while most of the older cameras were glued
in two places. I suspect this is an indication that the newer camera bodies
have already been recycled once, but I don't really care. All I care about
is that the new ones are missing the more obnoxious of the two glue spots!
To tell which kind you will be trying to reload, look on the side of
the camera nearest the advance wheel (the "right" side of the
camera, seen from the back). If you see two little holes centered vertically
but positioned near the back of the camera, you have one of the dreaded
two-spot-glued versions. My condolences. :) Seriously, though, these cameras
are much tougher to reload than the ones glued in only one place.
If you have a camera which has two glue spots, start by working on the
glue spots on the side of the camera. Personally, I have had decent success
getting through these spots simply by trying to force the plastic open;
eventually the glue yields. Sometimes it doesn't, though, and the camera
gets broken. :(
Another way to get through the two glue spots on the side is to drill
through them. The glue spreads a little inside, so just drilling out the
holes isn't enough; you need to use a large drill bit (like 3/8")
on each hole. Be careful not to drill holes in the back of the camera!
This method will require you to seal the holes you just drilled before
you use the camera. You can tape over the holes with black eletrical tape
(easy, but not so permanent), or glue a strip of black plastic over the
holes (harder, but overall a much better solution).
Now that the side of the camera is "openable," you need to
work on the bottom. The bottom of the camera is glued to the back (naturally),
so there's some work to be done here. First, locate the little flap on
the bottom of the cameras which looks like it's attached to the back (it
won't be, when we're finished). Slide your knife blade under the flap from
the "front" side, and work the blade back and forth until this
flap breaks off. Don't force anything too much, but the idea is to break
off this flap completely. Just like when you removed the back panel of
the paper carton, the intent here is to cut through the glue, not the material.
You'll probably break the two little restraining tabs; don't worry about
this.
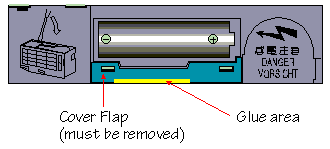
Here's a picture which shows the flap which needs to be removed, and
where you have to cut through the glue on the bottom of the camera. The
glue spot, which is under the flap, is represented in yellow.
Once the flap has been removed, you're ready to start the real work
of getting through the glue spot. The glue spot is in the center of the
area you have just been working on, at the back of the camera. It's about
3/4" (2 cm) in extent, and stretches vertically up the back of the
camera. There's a small gap or seam where the two pieces are joined; this
is where the glue is. You need to cut through this spot entirely, and it
takes some work to do this. Personally, I found that scraping through the
seam with a small screwdriver worked better than trying to cut through
it with a knife, but you may have different opinions. It took me maybe
three or four minutes of patient scraping to get through the glue, so be
ready to spend a little time working on this. You'll know that you've made
it through the glue when the screwdriver / knife blade suddenly is able
to descend a little deeper in to the plastic.
You need to be a little careful when getting to the bottom of the glue;
if you scrape too deeply, you can damage or destroy the guide rails which
keep the film in place as it advances. These rails also act as a barrier
to external light, so it's important that you do not damage them too heavily.
If, when you remove the back of the camera, you discover that the bottom
guide rail has been heavily damaged, you should probably throw away the
camera and start over with a new one.
Now that the two glue spots have been removed, the back of the camera
is ready to be removed. Just like with the front, there are several restrining
tabs which must be released before you can remove the back. There are two
on the top (you might not need to release these; see the explanation after
the picture), and two on the back on each side of center (horizontally),
above center (vertically). Unlike the tabs which hold the front in place,
it's important not to break these restraints, so be gentle! As before,
keep pulling gently, wiggle the camera pieces relative to each other, and
press the releases. To release them, insert a smal screwdriver into the
holes as far as it will go, and gently pull downwards on the screwdriver
handle. Keep pulling!
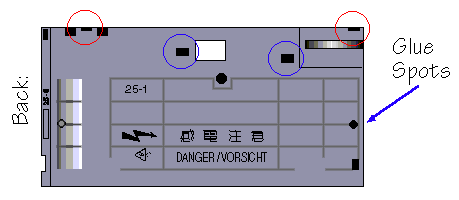
In this picture, the latches which must be releasesd on the back of
the camera are circled in blue. The red circles indicate the latches on
the top of the camera, which must be released in order to remove the camera
front. If you have already removed the front of the camera at this point,
you won't need to worry about these. If, however, you are removing the
camera back and the front is still attached (you might want to do this
while reloading), you'll need to release the top latches in order to remove
the back. These latches basically hold the camera front to the camera back.
Also for your convenience, I have noted the place where you will find
the two glue spots on the side of the camera, if they are present.
Step Four: Modifying the QuickSnap for use with regular film cannisters
Once the camera front and back have been removed, it's time to modify
the camera for use with regular film. Assuming that everything has gone
smoothly, there should be only one modification required. If you look at
the top of the film cannister you removed from your QuickSnap, you'll see
that the film spindle has litle vertical gear teeth in it. These teeth
mesh with similar teeth in the advance wheel of the QuickSnap, and provide
the necessary "grip" for the wheel to wind the film back into
the film cannister.
Now look at the spindle on a regular 35 mm film cannister. These spindles
do not have the little teeth. The consequence is that normal 35 mm film
cans will not fit onto the advance wheel of the QuickSnap.
To get around this problem, remove the advance wheel from the camera
body. You can do this by tilting the advance wheel towards the center of
the camera body and pulling towards the side.
Once you have the wheel removed, take your knife and cut away the teeth
on the ridged spindle in the center of the advance wheel. If you cut "downward,"
along the axis of the spindle, making as many passes as required to remove
all of the teeth, this job is easy. Be sure to scrape away any plastic
shavings produced in this process; you don't want anything fouling the
camera mechanisms after you load new film and seal the camera!
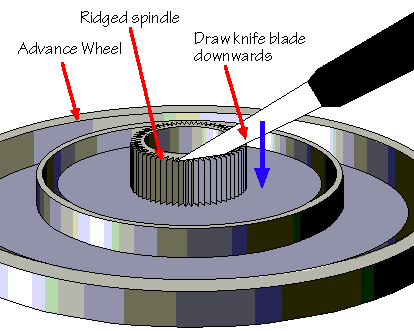
This picture shows what the advance wheel looks like after it has been
removed, and demonstrates how to shave off the offending parts.
Now replace the advance wheel back where it came from on the camera
body. Reverse the process by which you removed it; tilt the wheel towards
the camera center and push inwards. You may have to jiggle things as you
do this, and you may have to apply some force, but it should snap back
in without too much trouble.
Once the advance wheel is back in place, you can try sliding a new 35
mm film can into place to see our next problem: the advance wheel turns
without turning the film spindle! We need some way of rewinding film back
in to the film can, so we have to modify the advance wheel again! What
we need to do is to provide some contact between the advance wheel and
the spindle on the film can.
The idea here is to glue a small strip of plastic onto the advance wheel.
This strip should be long and thin enough to reach into the spindle on
the film can and engage the slots there, but short and thick enough to
be structurally sound. What works for me is a square 3/8" (9.5 mm)
on a side. You can try to re-use the plastic flap which we broke off from
the bottom of the camera, or you can buy a small sheet of plastic from
a hobby store. I found a sheet of "styrene" in the model-building
section of my local hobby store. It was a sheet of opaque grey plastic
10"x4" in size, 1/16" thick (25 cm x 10 cm x 1.5mm), and
cost me about $2. If you are reloading the type of camera which had the
awful glue spots on the side of the camera, you'll need a sheet of opaque
plastic anyway.
Styrene is very easy to work with. You need a ruler (or anything with
a straight edge) which you can use as a guide for your knife. Just make
a few strokes along the ruler with a sharp knife and then bend the plastic
along the cut you just made. It should snap easily. You'll need to apply
some pressure shile scoring the plastic, but don't try to cut all the way
through; just scratch the surface deeply.
Once you have a strip of roughly the right size, try inserting it into
the spindle of a 35 mm film cannister. If the strip doesn't fit, trim it
down by scraping the edges with your knife. You want the strip to be as
large as possible but still slide into the film can without getting stuck.
Gluing the strip in place can be troublesome, because the strip needs
to be more or less vertical. Also, a strip glued to the surface of the
advance wheel might not be sturdy enough to rewind the film. I recommend
cutting a slot through the advance wheel into which the strip can be placed.
Then you can glue the strip onto more surface area, and the walls of your
slot will provide some support while the glue dries. Either way you go,
you'll have to do the gluing with the advance wheel in place in the camera;
once the strip is in place the advance wheel will be difficult (if not
impossible) to remove from the camera (or place back into the camera!).
Cutting a channel in the advance wheel is not difficult; if you use
a sharp knife, you can easily cut through one side of the little cylindrical
wall; then cut a similar groove in the wall directly opposite from your
first cut. The walls need to be more-or-less vertical (i.e. no taper),
and the groove should allow the plastic advance strip to make contact with
the spindle in the center of the advance wheel. You can keep cutting away
a little at a time, checking the fit of the advance strip, for best results.

After you have cut the slot, wedge the strip in place (hopefully your
slot is tight enough that this is possible), and try inserting the whole
assembly into the top of a 35 mm film cannister. The film cannister must
be able to reach all the way to the base of the advance wheel without grabbing
or binding. Pull off the cannister and see if the advance strip comes loose
from the slot; it shouldn't. If it does, keep trimming down the width of
the strip a little at a time until the film cannister can slide off of
the strip without grabbing. Then reassemble the advance mechanism and re-insert
it into the cannister, and make sure that turning the wheel turns the spindle
on the film cannister.
This picture shows what the altered wheel looks like after the new advance
strip has been attached.

Once you have a good fit, remove the advance strip and replace the advance
wheel back into the camera. Then turn everything upside down, insert the
advance strip back into the groove, and glue it in place. If you're using
regular model glue, you should smear some onto the strip before sticking
it in place. If you're using styrene weld (recommended), you can just brush
some on to the joints between the advance wheel and the strip after it
is in place; capillary action will draw the solvent into the cracks. Be
sure to use enough glue to make a good weld, but not so much that it spills
and runs over the rest of the camera!
After about half an hour, the weld should have set. Check that the bond
is a good one by pulling on the strip; if it moves at all, you probably
need to re-glue it.
It has recently come to my attention that people are having problems
advancing the film after reloading. Most likely, this is due to abrading
the groove surrounding the spindle, or because excess glue has dripped
into said groove. If you compare an actual advance wheel to the picture
above, you'll see that there is a channel between the center spindle and
the next ring. In that channel, at the bottom, is a small groove. This
channel and groove are where the advance wheel rests on a hub inside the
camera itself when you replace the advance wheel. If there's any glue build-up
in the channel or the groove, the advance wheel will bind to the hub, making
it harder to advance the film. In at least one case, a this has prevented
the user from advancing the film at all during a dive.
After the glue has set, I take my proverbial small flat-blade screwdriver
and run it around the channel, and almost always find that I can scrape
out some glue. I also tend to nick and abrade the channel in the process
of shaving off the spindle gearing, so scraping the channel clean seems
to polish up the results a little. You can check that the advance wheel
spins with normal effort by replacing it in the camera and advancing it
a little....if it's tough to turn, you probably still have some gook in
the channel.
Brian Basura (basura@mail.dec.com)
sent me a great tip about the advance wheel. He points out that if you
remove the shutter assembly from the camera, you can get the advance wheel
out painlessly. This will also let you glue the advance strip onto the
advance wheel while it is outside of the camera; this is much easier than
the in-place method I describe above.
To remove the shutter assembly, you first need to remove the flash assembly.
To do this, look at the camera while the front piece has been removed,
and look for a restraining latch about 1 cm to the right of the lens socket.
Pull this latch to the left, and the printed-circuit board should lift
out easily. Set it aside carefully, and, as always, be careful not to
shock yourself by touching any metal contacts or the flash capacitor!
Now pull that same latch to the right, and gently lift the shutter assembly
upwards. You're still not done; there's a second latch which must be released.
The second latch is on the left side of the shutter assembly, and must
be released by inserting a small screwdriver between the shutter spring
and the rest of the assembly. Stick the screwdriver in as far as it will
go, and pull the handle gently to the right. Another gentle tug on the
shutter assembly should lift it free completely. Now you can remove the
advance wheel with no effort.
When releasing the second latch on the shutter assembly, be careful!
I broke one with very little force. I don't know if it will be a long-term
problem, but the shutter assembly is definitely a little loose now. I also
wouldn't recommend removing and replacing the shutter assembly too often.
Step Five: Preparing your modified QuickSnap for reloading
There a several last things which must be done before you can load the
camera with new film.
First, you must re-attach the front of the camera to the camera body.
Be sure to replace the lens and the flash activator arm before you
do this! The flash activator arm should go in so that the hollow
side of the little cup is pointing up as the cup sits in its well. Once
the lens and flash arm are in positioned, place the front of the camera
on the body, and squeeze the two together firmly. You will probably have
to squeeze in several places, and will hear several snapping sounds as
the restraining tabs reseat themselves. Make sure the front is firmly attached
to the body before proceeding.
Now insert the battery into its socket. The flat end ("-"
terminal) of the battery goes against the pointy little knife-blade terminals
in the socket, the pointy end ("+" terminal) against the terminal
with the rectagular hole in it. Once the battery is in place, press the
flash-activator button on the front of the camera. You should hear a high-pitched
whine which tells you that the flash is charging. If you don't hear this
whine and the "flash-charged" light on top of the camera does
not come on after 5-10 seconds, something is wrong. Here are some possibilities:
- The battery is in backwards (flip it over & re-insert it)
- The battery is dead (try a different battery)
- The flash activator arm is not in place correctly (remove the front
of the camera and make sure it's in place properly)
If the camera has only been used once, the battery is probably safe
to use a second time. However, I wouldn't trust it for a third run; buy
another AA battery to replace the old one. Personally, I use Renewals and
recharge them every time.
The way the camera works is this: when you buy a new camera, the film
is unwound from the film cannister. The film is spooled into the little
holding cylinder on the side where the flash is located. As you wind the
film, you're really retracting it into the film cannister.
As the film is wound back into the cannister, the movement of the film
across a small toothed sprocket-wheel along the back of the camera body
is what advances the exposure counter and cocks the shutter. Before you
load the camera, turn this wheel to the right with your thumb until it
stops advancing. When the wheel stops, the shutter will be cocked, so be
careful not to push the shutter release button from here on! All of what
you just did is so you can use the first exposure on the new roll of film.
If you omit this stage, you'll have to wind the film before you can do
anything, wasting one exposure.
This is also a good time to set the exposure counter to reflect how
many exposures are on the roll of film you are loading. It's easily done;
just rotate the counter wheel with your thumb. This stage is not critical,
because there're nothing in the camera to stop the wheel from rotating
past "E" and all the way back to "27," but it is nice
to know how many exposures you have left! BTW, if you're loading 24-exposure
film, you might want to set the counter to 21, because the last 3 frames
are likely to be wasted due to the film leader being exposed.
Step Six: Loading new film into the modified QuickSnap
And now, the part we've all been waiting for!
You must do all activities from here on in a completely dark
room or in a photographic changing bag. Any exposure to light will ruin
the film, rendering it unusable for photography. What's worse, you won't
know that your film was ruined until you develop the shots (presumably
long after you have left the dive site), so be over-cautious now in
order to prevent future disappointment!
If you are planning to do this stage in a darkened room in your house,
I recommenddoing it only at night, turning off all lights in any room near
the room where you will be working, and sitting in the dark for several
minutes before starting. If, after this waiting period, you are able to
see anything, the room is not dark enough.
Personally, I use a changing bag. They're readily available at the nearest
camera store which stocks darkroom supplies (or they can order one for
you). Mine cost me $17. The changing bag I bought looks like a black t-shirt
with elastic bands around the sleeves and a zipper at the waist-line. You
stick your hands through the "sleeves," having placed any bulky
stuff in the bag through the zipper (there are really two zippers, with
a black skirt between them), and do your work in the "chest"
area. It's a great tool, because it allows you to reload your cameras anywhere!
Here are a few tips before loading the film. First, I use some black
duct tape to seal the edges of the camera after loading the film. This
may not be necessary, but I'd rather be safe than sorry. The bottom of
the camera assembly just looks like a veritable garden of light leaks to
me. Further, I attach a strip of this tape to the front of the camera on
the bottom edge, leaving most of the strip hanging off in space. This whole
assembly goes into the changing bag. Then, once the back has been attached,
all I have to do is wrap the tape around the bottom and onto the back...The
width of the duct tape (about 2" / 5 cm) is perfect for this idea.
No matter what method you use for loading the camera, I recommend doing
several practice runs before you try it with live film. It's better to
waste a $4 roll of film practicing than to chance wasting that same roll
(plus the dive photos on it and the cost of devloping it) by accident.
Just bite the bullet, buy a sacrificial roll of 24 exposures (hell, get
the cheapest, slowest, no-name film for this; you'll never develop it anyway!),
and do the practice.
Start by pulling the film all the way out of the film can. When you
reach the end of the roll, it won't come completely free, because the film
is taped to the spindle. Before you can load the film into the camera,
it has to be spooled up into a tight roll. If you roll the film as you
pull it from the cannister, your job will be much easier. Avoid touching
the film by any part except the sides. The sensitive side of the film
(the emulsion) will be a dull brown or dull grey in color; the non-sensitive
side will be shiny. If you have to touch the film someplace other than
the edge, be sure to touch the shiny side. However, oils from your fingers
can be deposited on this side, which will come in contact with the emulsion,
so even this should be avoided.
I find that get the best results by starting the spool by winding the
film very tightly. Then I hold my spool by the edges, pinched between thumb
and forefinger, and wind the film cannister around the growing spool. Keep
it tight! The film should be spooled in the same direction as it comes
out of the cannister; the emulsion side (the dull side) should be on the
"inside" of the roll, and the shiny side should face outwards.
Once you have wound all of the film from the can into a tight roll,
place the film can upright in the camera, so the film is to the left of
the can, stretching across the camera. Gradually unroll enough film to
stretch all the way across the camera, until the roll can fit into the
space for it on the left side of the camera. Once you have placed the roll
into its space, you can let go of it. It will unroll a little, but this
normal and shouldn't worry you.
Another thing you might want to try is to make yourself a little tool
for winding film. Go to the hardware store and by a piece of wood dowel,
maybe 3/8" or 1/2" in diameter. Cut off a piece maybe 3"
or 4" in length, and cut a narrow slot in one end (the slot needs
to be at least 3/4" long to do any good) with a saw. Now you have
a tool for winding film; insert the film leader into the slot, and twist
the dowel to wind the film. When the film has been placed in the storage
space in the camera, gently wiggle the dowel free from the film.
Of course, you'll still have to do the winding and such in the dark,
but at least your fingers won't need to touch the film!
Now you're ready to replace the back onto the camera. It should fit
snugly and snap into place after you apply some pressure. Just like with
the front, you will probably have to squeeze in several different places
in order to get all of the restraints to reseat themselves. Once the back
is on, the last step is to shut the two doors on the bottom of the camera.
They should both snap into place easily.
Take extra care to ensure that the camera is properly reassembled
before exposing it to light! Be sure to feel around the edges and make
sure all parts fit together smoothly.
If you have the kind of camera with the two glue spots on the side and
you did not cover them with a strip of plastic glued in place, you'll need
to cover the holes on that side with a piece of black tape before you remove
the camera from the changing bag.
As mentioned before, I recommend lots of practice before you try this
with live film you intend to use. Try a few practice runs sitting at the
table with your eyes open, then a few with your eyes closed, and then a
few in your changing bag or dark room. Don't move on to live film until
you can load it easily!
One last suggestion: once you're confident that you can load a roll
properly, load one, and go take pictures of your house, your significant
other, your friends, your dog, your car, etc. Get that roll developed to
see if everything comes out OK. You want to find any problems before you
take a reloaded camera diving with you!
Oh, you're not quite done. You'll need to put the camera back
in its paper carton. The carton is important for proper fit in the Aquashot.
Odds and ends
I don't really have anything to say here. This space is for future development.
Pre-loading Checklist
Here's a checklist of things you need to do / have ready before you
go into the darkroom or put your camera & film into your changing bag.
I recommend printing this page and actually using it each time you
load a camera so that you don't forget something. Once the film has been
pulled from the cannister, it's too late to change anything which has to
be visually inspected!
This is a list of everything which made me yelp out a Homer Simpson-style
"doh!" during recent reloading attempts. :)
- Are the camera lens and flash activator arm in place in the camera?
- Is the battery in place in the correct orientation?
- A more strict check: if you push the flash button on the front of the
camera, does the flash charge up? That is, can you hear the whine? If not,
check both the battery (orientation, age) and the flash activator arm.
It's possible to get the flash activator arm in place backwards!
- Are both sides of the lens clear of dust, dirt and fingerprints?
- Is the camera front attached to the camera body?
- Is the exposure counter set to the right number of exposures?
- Is the camera shutter cocked? (i.e. did you turn the little sprocket
in the camera body to the right until it wouldn't turn any more?
- Did you attach the light-sealing tape to the camera front?
- Is the film path clear of all debris which might scratch the film?
Here's a reminder of what needs to go in the changing bag / dark room
with you:
- Camera body / front (assembled, with tape and battery in place)
- Camera back
- New film
- Film winding tool (if you use one)